Setting up macro parameters
The behaviour of macros can be changed by parameters of different types. Impresario allows its users to change parameters in the property window. Before this feature can be used a macro has to define these parameters. For better understanding what is possible here, the following subsections give more indepth knowledge about how Impresario presents parameters.
Default parameter presentation
To give macro developers more freedom on how to present parameters to the user, the
settings area of the property window
is not implemented in C++ but scripted in Qt’s QML language. All
scripts making up the parameter presentation are located in Impresario’s
resource directory which is resources by default.
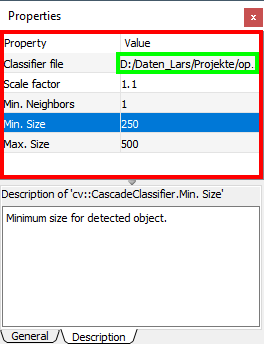
QML components of settings area (Click to enlarge)
The figure to the right shows how the settings area is composed by default. The red rectangle marks
the main component which is a list view implemented in file PropertyWidget.qml.
Each parameter is presented in a separate row. The green rectangle highlights the inplace editor component for one
parameter. There are different types of inplace editor components for different data types and purposes.
Inplace editor components are implemented in separate QML files and loaded dynamically by the main list view.
The highlighted inplace editor component in the figure is a file selector and implemented in file StringFileSelector.qml.
Each inplace editor component may have properties which restrict the input a user can make. The following list shows available inplace editors with their properties:
StringLineEdit- Simple line editor for string datatypes.
- Properties (Default value):
maxLength (255): Maximum length of inputreadOnly (false): Makes the string read only
StringFileSelector- Line editor for file name input. A button opens a separate file selection dialog. The file name is contained in a string.
- Properties (Default value):
maxLength (512): Maximum length of inputmustExists (true): File with given name must existtitle ("Select file"): Title for file selection dialogfilters (["All files (*.*)"]): Filter list for file selection dialog
StringDirSelector- Line editor for directory name input. A button opens a separate directory selection dialog. The directory name is contained in a string.
- Properties (Default value):
maxLength (512): Maximum length of input
BoolComboBox- Read only combo box allowing to select
trueorfalsefor boolean data types. - No Properties
IntSpinBox- Spin box editor for integer data types.
- Properties (Default value):
minValue (0): Minimum allowed valuemaxValue (0): Maximum allowed valuestep (1): Increment / decrement step when using spin box controls
RealSpinBox- Spin box editor for floating point data types.
- Properties (Default value):
minValue (0.0): Minimum allowed valuemaxValue (0.0): Maximum allowed valuestep (0.1): Increment / decrement step when using spin box controlsdecimals (1): Number of displayed decimals
IntComboBox- Read only combo box returning the index of the selected item.
- Properties (Default value):
items (["Empty"]): List of items to be displayed
Note: This list may not be complete as developers may implement further components. In this case it is the easiest way to just have a look a their source code directly in Impresario’s resource directory.
Data exchange with QML
Parameter values are exchanged between the QML components and the macro libraries by means of strings, i.e.
each parameter value of a macro is converted to a string and handed over to the QML component. In reverse direction
changed parameter values are received by macros as strings and must be converted back into their original data type.
For this purpose a helper class called ParameterValueConverter exists:
template <typename T>
class ParameterValueConverter {
public:
  virtual T fromString(const std::wstring& strValue) const;
  virtual std::wstring toString(T value) const;
};
This class has two methods for doing the conversion described above and an implementation which handles all simple
data types including std::string and std::wstring.
If you have more complex data types you have to provide your own parameter value conversion which can be realized in two ways:
- Specialize
ParameterValueConverterOR - Derive your own class from
ParameterValueConverterand override the two methods.
Defining parameters with default view
For defining parameters in your own macro class using the default parameter presentation as pointed out in
Default parameter presentation
the base class MacroBase provides the following method which
has to be called in the macro’s constructor for each parameter to be defined:
template<typename T>
bool addParameter(const std::wstring& name,
                  const std::wstring& description,
                  const T& tDefaultValue,
                  const std::wstring& qmlUIComponent = L"",
                  const std::wstring& qmlUIProperties = L"",
                  const ParameterValueConverter<T>& converter =
				        ParameterValueConverter<T>());
Like for addInputand addOutput the template argument defines the type of the
parameter you like to create. This can be any type.
The first argument name is the parameter’s name. This name is displayed in the
settings area of Impresario’s property window
as soon as the macro is selected in the process graph editor.
The second argument description is a short description of the parameter which is displayed in the
information area of the property window as soon
as the parameter is highlighted in the settings area (see also figure above for an example).
tDefaultValue is the parameter’s default value. The default value is used as initial value in case no value
was restored from a saved process graph.
qmlUIComponent is the name of the inplace editor component to be used for changing the parameter without
extension .qml. The name should be considered case sensitive in case your macro is intended to run on
different platforms.
In qmlUIProperties you provide the optional properties for the selected inplace editor component. These
properties are coded in JSON notation and are case sensitive.
Finally, converter is the helper class for converting the parameter value to a string and back as described
in Data exchange with QML. For simple data types the default value
is usually sufficient. For special cases you can provide your own converter here.
The method returns true in case the parameter was successfully added to the macro, falseotherwise.
Note: Internally each parameter is appended to a vector so that they are indexed in the order of definition. This index starts counting from zero. This is important to remember when you have to access the parameters later on during processing.
Example
We now complete the constructor of our edge detection example by adding two parameters of type int. As UI component
we use the IntSpinBox and set its minimum and maximum values.
#include "cannyedge.h"
#include "ltiChannel8.h"

LtiCannyEdge::LtiCannyEdge() : MacroBase{} {
  // set up macro description
  setName(L"lti::cannyEdges");
  setCreator(L"Lars Libuda");
  setGroup(L"Image Processing");
  setDescription(L"Detects edges in a lti::channel8");
  addInput<lti::channel8>(L"Input image",
           L"8-bit grey scale image for edge detection");
  addOutput<lti::channel8>(L"Output image",
            L"8-bit grey scale image with detected edges");
  addParameter<int>(L"Edge Treshold",
                    L"Value used to denote an edge pixel",
                    255,
                    L"IntSpinBox",
                    L"{ \"minValue\": 0, \"maxValue\": 255 }");
  addParameter<int>(L"No Edge Treshold",
                    L"Value used to denote a no-edge pixel",
                    0,
                    L"IntSpinBox",
					L"{ \"minValue\": 0, \"maxValue\": 255 }");
}
Please continue with section Processing data.
However, if you are not happy with the default parameter presentation Impresario provides, you can jump to section Advanced parameter presentation. There you will get to know advanced methods for parameter presentation which give you more freedom for this task.